 |
| I got the postcard |
I think I mentioned that over the last month or so I have been watching a bunch of online photography lectures. I've been doing this when I get home for the night. I've done a lot of experimenting and playing with light, aperture, and settings. Some of my experiments have resulted in deleting an entire photoshoot. That is fine with me. The nice thing about digital is I can take and delete all the photos I want. I just have to make sure to recharge my battery!
That said, about deleting an entire shoot, I still try to take visualize and take good photos. I don't just shoot to shoot. At the end of the day, there just might not be anything interesting enough for me to want to keep.
Lately, I have been attempting to put this newfound knowledge to good use. Taking photos of things I actually want photos of, and wanting them to be good is a little more pressure than just experimenting. It's fine to take plenty of bad photos if you don't care what you are looking at, but when it's a rare bird, a moment with a family member, or a vacation photo, you don't want to screw it up.
Here are some of the things I have learned. This isn't a refresher of the forty or so lectures I have watched. Just some good points that may or may not help you out. Keep in mind here, I do not think I am some kind of professional photographer. Just because I am passing out free tips does not mean I am any kind of photography guru. But so far this stuff has helped me, maybe it can help you.
1. If you want to be a better photographer put yourself in front of more interesting stuff.
Seems simple. It is easier to take photos in or at interesting places. I'd probably enjoy your photos of a vacation to Maine much more than seeing portraits of your family.
2. Go beyond the postcard.
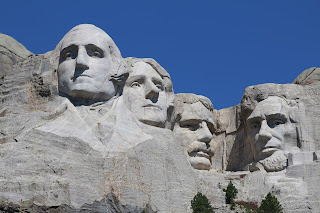
For most of my life I have chased the postcard. I wanted the clear unobstructed view of Rushmore, Lincoln Memorial, Independence Hall, etc... I always wanted to capture the postcard view. But, if you think about it, we have all seen those views a million times. We have seen them in everything from calendars to car commercials. Instead, go make a photo of a famous place that you've never seen before. Go find a shot the world has never seen. For example, we have all seen the Statue of Liberty with a blue sky behind her, right? But have you ever seen a photo of the back side of the statue? I think not.
 |
| I got the shot I wanted. But there aren't people to give it scale. There's no life to this photo at all. Yawn |
3. People in the photo make for a better photo.
I didn't need someone to tell me this. I realized this at Disney. For months, I had thought about getting photos of Cinderella's Castle with a bright blue sky and no one in the photo. I figured it would be impossible. However, when we got to Disney, I could work the camera to get exactly the shot I wanted. And you know what? It was boring as hell. Without people in the picture, it was no more exciting than a gravestone. The photos with happy Disney guests walking down Main Street with the castle in the backdrop would have been much better. I didn't get much of a chance to do that because the goal of the day was to enjoy Disney, not to waste Laurie's day while I photographed crowds.
4. Not everything needs to be in focus
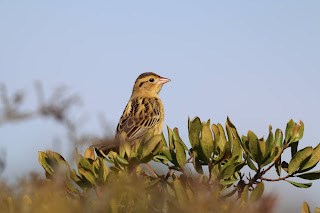
I knew this one already. If your taking a photo of a particular subject, it is easier to make them pop out in your photo if they are the only thing in focus. This is obviously something I knew from getting photos of birds. The same is true of people, if you are taking a portrait of a friend in their backyard and everything in the background is in focus, it may looked cluttered. There could be too much distractions and people won't see what you want them to look at.
5. The horizon
The rule of thirds says the horizon should not split the photo in half. Put it a third of the way up or a third of the way down. But you can use the sky as your background if it is nice and have the horizon near the very bottom of the frame. On the other hand, if the sky is blown out, you can show very little of it or even none at all in some landscape shots.
6. Learn how to adjust the brightness of your exposure.
Most cameras have a way to over or underexpose the photo. Learn how to use it. Most of the time in bright light you want to underexpose your photo. Here is why, when you go home, you can always adjust the photo to make it brighter. But if it was over exposed, whatever was too bright will be lost because the sun or light hid it and you can't get that info back.
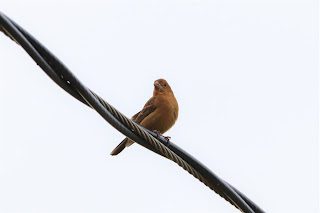
However, underexposing isn't always the right choice. On Friday I got a photo of a Blue Grosbeak on a wire. There was nothing behind it but bright white overcast sky. The bird was nothing but a silhouette in my first photos. Luckily for me, the bird stayed there long enough to play with my settings, I overexposed the bird two full stops to make it brighter. It worked, I got a couple fairly good photos in really terrible light. If the bird wouldn't have flown away, I would have kept trying different things.
7. Try to get the photo right in your camera instead of in post processing.
If you get the photo you want in your camera by adjusting light, aperture, distance to subject, the photos will be better quality than if you have to adjust them on your computer. More importantly, at least to me, you will be proud of yourself if you get it right without adjustments. No one is perfect, and of course, we are all going to have to adjust some of our photos. However, I am striving to get it right in the camera and not in post.
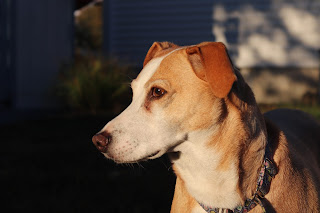 |
| Jess's dog Stella in the last natural light of the day |
8.Make use of good light.
What is bad light? Usually it is harsh bright high sun in the middle of the day. You can work with it of course, and sometimes we have no choice. If I'm on a whale watch between 10-2 and I want to get a photo of my friends, I can't wait until sunset to get a photo of the setting sun in the background.
However, the best light is soft. Usually early or late in the day, even overcast days can be
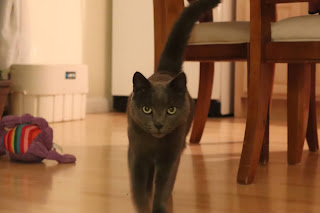 |
| Jess's cat Buck in the soft light of her living room |
good because you don't have bad shadows. Using natural light to your advantage is nice. Whatever you can do to find good light will make for better photos. I took some photos of my friend Jess's pets in good light. You can see what I mean
9. Be creative.
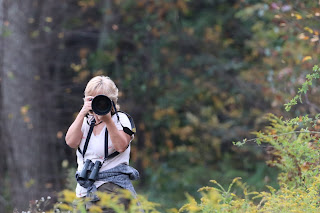 |
| I found this photography "quick draw" with my friend Sue much more interesting than if I would have just asked her to smile. |
I spend a lot of time taking photos of birds. But I a working on trying to expand my horizons and make interesting photos of other things. But I do not want to do the same old photos we have all seen and been in. When I go birding with friends, I don't want to just take a grin for the camera photo of someone. I'd rather get a candid shot of them doing something interesting. There is literally an infinite number of things we can door have are subjects do that is more interesting than telling them to say cheese.
10. Be hard on yourself, but also enjoy your photos
What do I mean? If you want to become a better photographer, learn from your photos. Try to figure out why a photo works or doesn't work. Try to figure out how you could have made it better. Did you see the telephone pole coming out of the back of her head? Did I make the horizon crooked? Is the background cluttered? Should I have blurred it?
Be hard on yourself, but at the same time, just because a photo isn't perfect doesn't mean you can't love it. For example, you took a photo of your family eating supper, they are all happy and your kid makes a cute face, it is a special moment, right? It's something you want to remember. But you realize that the window on the right is overexposed. So the photo isn't prefect. You're not going/shouldn't throw it away. The photo means something to you. So cherish it. Be happy you caught the moment,
Another example- My favorite picture I took in New Hampshire is slightly out of focus. I know that. If I had more than a second, I might have snapped a few more frames. But I am okay with what I got. Actually the out-of-focus guy in the canoe sort of enhances the pic to me. Instead of worrying about the detail you get a sense of a guy canoeing a mountain lake in autumn. I like it, and if you don't, that's okay too.


No comments:
Post a Comment